Category Archives: surface decoration

Flame Hat

I started this hat a couple of weeks ago but when I went to add some textile foil onto the “flames” I found only sliver, green and red foil in the cupboard, but really wanted gold for this hat. I placed an order and it arrived on Saturday.

When applying textile foil I normally use textile glue and fix the foil with an iron but the curly shapes of the flames made this very awkward so I resorted to waiting for the glue to dry naturally before removing the backing plastic.

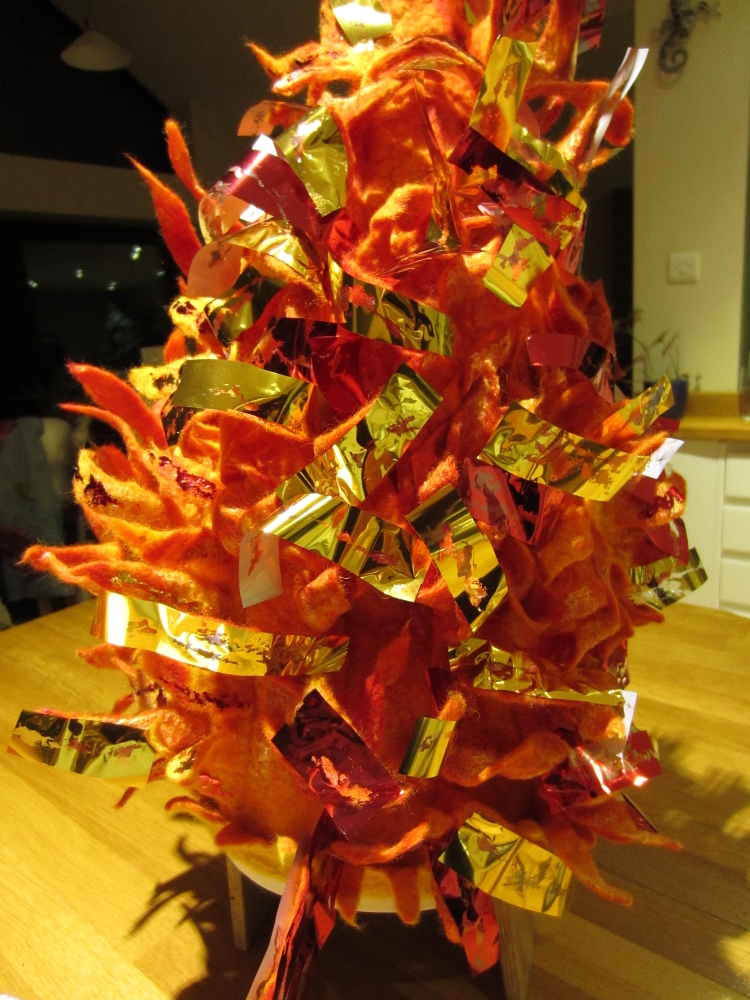
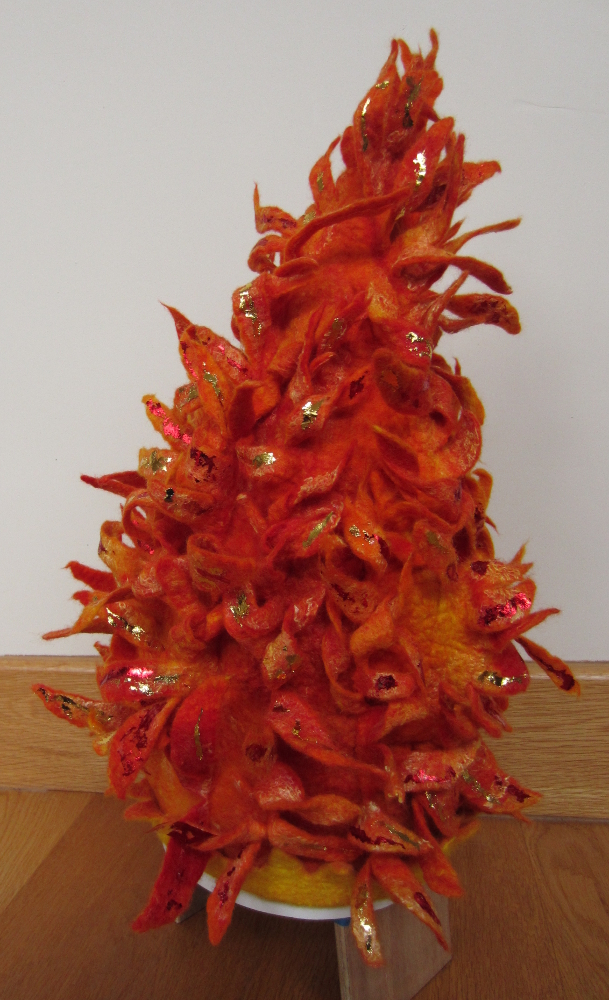
Here it is covered in foil strips waiting for the glue to dry:

IMG_5894

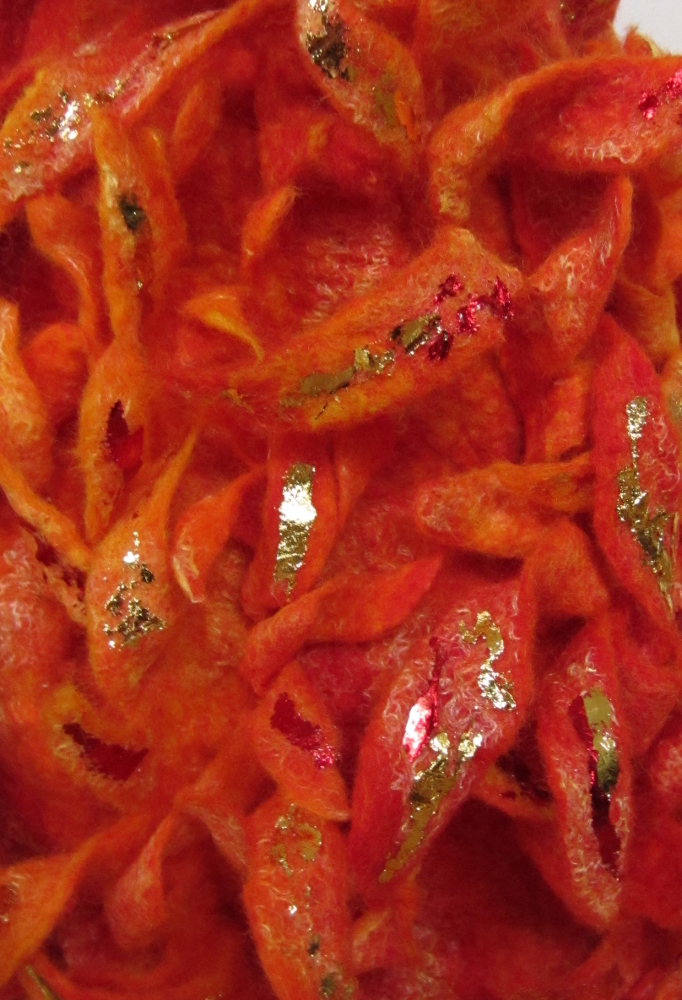
A close up of the foiling, I think you can see that there is a mixture of red and gold foil:

IMG_5896

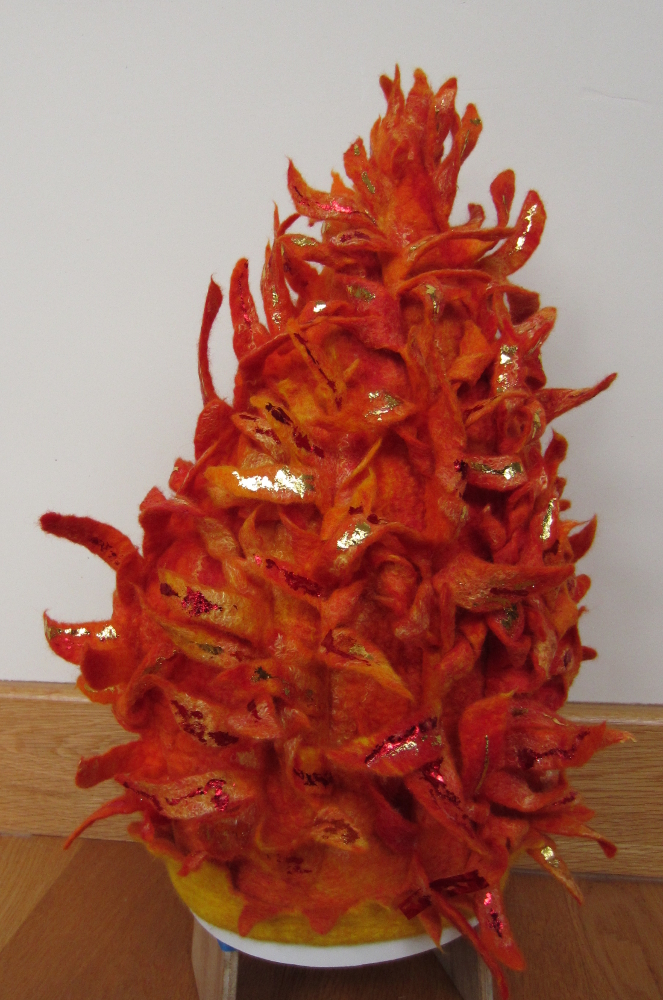
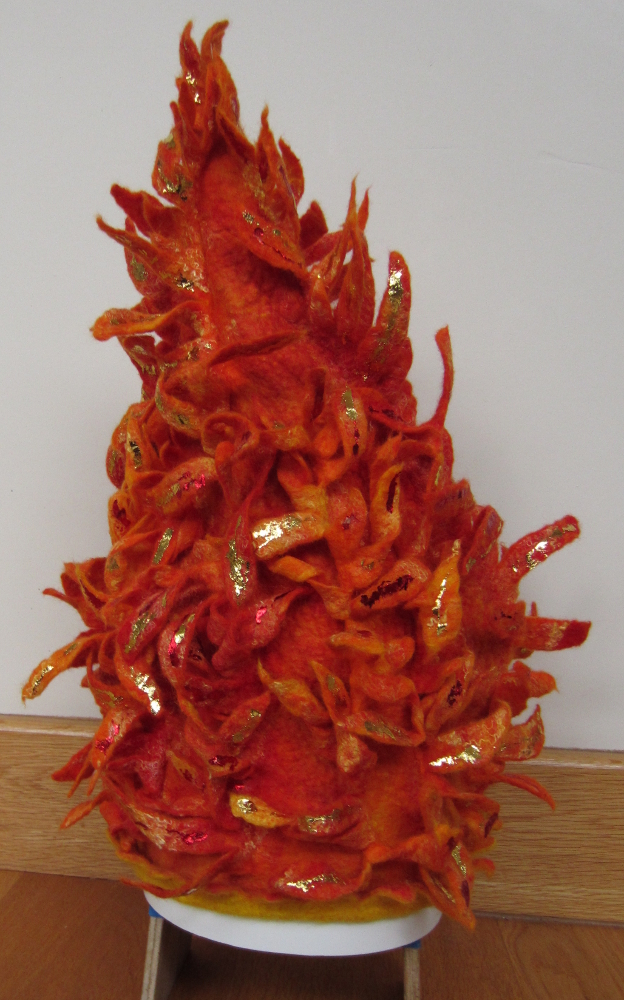
The finished hat from different views:
IMG_5901

IMG_5900

IMG_5898

For those of you reading by email, this is the link to the web page: blog post

Foiling Experiments

A few months ago, someone (sorry I forget who) posted on the Felting and Fiber Studio Forum about adding some textile foil to a piece of felt, this had me fascinated so I rushed out and bought some to play with, these are the results of my initial experiments.

I used a wooden stamp of a zebra for the first one, unfortunately I used PVA glue and when I tried to full the felt some more after the foil had been applied, the glue dissolved and the foiling disappeared so I reapplied it when dry and now it looks a bit fuzzy.IMG_5864

This one was drawn free-hand with textile glue straight from the tube, I think it worked pretty well and looks much more impressive in real life.

IMG_5866

Q3 Challenge Part 2

I have been spending every spare minute working on my challenge piece, and unusually for me, I have been remembering to take lots of photos so you can follow the journey of the piece. In my last post I shared photos of the carded batts and dyed silks and yarns, well, this is story of what became of them…

Laying out a two-tone merino base

 IMG_4718

Laying out the batts over the base

IMG_4719

IMG_4721


IMG_4723
Adding silk cocoons and wetting out the growing pile of fibre to regain some control before adding some strips of hand-dyed silk

IMG_4725

I like the bumps at this stage, it’s like the felt is pregnant and waiting to pop out lots of little felt babies 🙂

Close ups of all the lovely texture

IMG_4727 IMG_4729
Adding some yarns to lead the eye around the hanging

IMG_4730

And some splashes of yellow chiffon and a few more bumps

IMG_4732

I made some prefelts out of the left over batts and plan to incorporate those, there’s still a way to go but it’s definitely making progress. Unfortunately an irresistible distraction was waiting for me on the door mat this afternoon, so I’m not sure how much further it will get this evening…

IMG_4733

And none other than our very own Lyn and Annie of Rosiepink have an article in this copy too 🙂

IMG_4734


A Productive Week

Not sure what happened to me this week but it’s like someone put amphetamines in my coffee. Last week I could barely motivate myself to cook for myself and only managed to produce one piece of felt. This week I have turned into a felting whirling dervish… Here are a few of the things I have started / finished so far this week:

I dyed the lacy scarf I made on Sunday but after looking at it for a couple of days decided I wasn’t that happy with it so put it back in the dye bath.

Much better!
It now makes me think of autumnal leaves falling into a river.

Some felt cuffs using a similar technique to the scarf, there is an adult and 2 child sizes, I think you can just see where I have cut some slits in the adult one, I hope the cuts will open up to make a lacy effect with a little felting persuasion.

A little felt pod made using an adaptation of the lacy felt technique to create the loops you can see in the second picture.

A felt vase made from some shibori dyed prefelt, this is still very much a WIP but I hope the top will look like a 5-petal flower when it’s finished.

A Halloween-inspired bag, still quite a long way to go on this one but I think you can make out that it will be a pumpkin… one day!

I started this “coral” piece before I went on my hols but it takes so long to needle-felt each strip into place that I only just got as far as wet felting it this week. It is currently drying and waiting to be fixed to some stretcher bars.

These 2 pieces were started at Dagmar Binder’s class in September. The pale blue piece was an uninspiring, flat multi-layered disc that I have been looking at for weeks trying to decide what to do with it. I finally picked it up and started playing with it this week, folding it this way and that and this shape was born. An hour of stitching later and it is now drying in it’s new form. Given that I was ready to throw it on the reject / recycling pile a few days ago I’m rather pleased with how it turned out.

The dark blue piece below is a sewer’s bowl, the raised ring around the outside is a perfect pin cushion, while the bowl will prevent your reels of thread, beads etc. from rolling away. It was inspired by photos of a coral polyps:

A nuno felt scarf (would you believe, dyed the silk, felted and finished this week, including a rolled hem).

I also felted this cotton scrim and embroidered bowl, even after using CMC to stiffen it I wasn’t that happy that it would keep its shape so opted to felt it.

And finally another piece from Fiona Duthie’s surface design class. I think this might be come a book cover…

As if all this wasn’t enough I have also scoured and dyed a Shetland fleece, all the beautiful colours are busy drying over my bathtub. More on those in another post.

I think I have earned myself a glass of wine 🙂 Hope you are having lots of fun in your felting adventures too 🙂

Linking up to nina-marieoff the wall Friday

Fiona Duthie Surface Design Workshop

I signed up for Fiona Duthie’s online suface design workshop a few weeks and it started last week and I have to say I am loving it! Although many of the techniques we have covered so far are already familiar to me, Fiona has some quirky suggestions for how to use the techniques that I am finding very refreshing and stimulating. It looks like we will be covering 2 or 3 techniques each week and coming to the end of week 2 I am loving combining the different techniques in new ways.

While I don’t feel it would be fair to Fiona to share the actual techniques here I think it is ok to show some of the results….

I plan to add some stitching to this piece to highlight the setting sun on the left and make the foreground look more like a beach.

I still need to do quite a lot of needle-felting details onto the turtle’s head and legs and I will add more texture to the “rock” with some stitching but am pleased with how this piece is coming along.

Rainbow Theme Continues….

I have been making a few of these recently, dyeing the prefelt is a lot of fun and I think the finished effect is very striking and the bright colours make me feel happy. This piece reminds me of aliums as they go to seed so have called it “Rainbow Alium”.

I also managed to mount my coral piece onto a wooden frame ready to go onto Etsy. I decided the white shows off the folds beautifully so chose not to dye this one. Here is the finished piece.

Translucent felt

As I mentioned in my last post, I have been doing almost obscene amounts of dyeing this week, one batch was for my C&G course and was predominantly focussed on dyeing different animal fibres in the same dye vat (bag in my case) so you end up with a harmonious blend of colours in a range of materials. I chose to use each pair of primary colours so had 3 “vats” and the these are the results.

Each vat contained, Corriedale top, some alpaca top, silk hankies, ponge 5 silk, a piece of commercial prefelt, some merino pencil roving and a piece of hand spun White Faced Woodland.

For good measure I threw in some of my scoured Jacobs fleece too…

The colours are so lovely I kept finding myself standing in the bathroom literally watching them all dry 🙂 Needless to say I couldn’t wait to use them…
Our brief from the course was to create a piece of textured felt using the design work form previous weeks (in my case I had been working with bone micrographs).
I cut out some silk shapes that resembled the holes you see in bone when under the microscope.

And laid resists over the top that were just slightly smaller than the silk.

Then added 2 layers of the corriedale roving, pulling the tufts was lovely as I had different colours with each pull.

I even spun some of the orange/red pencil roving, my spinning is definitely improving but I’m not about to win any prizes for producing beautifully even yarn.

After felting and cutting out the resists.

I’m really pleased with how this piece turned out but it really comes to life when you hold it up to the light:

The corriedale has produced a beautiful crimp and the silks look like stained glass windows. I think this technique would make a stunning lampshade or even curtains.
Here is a closer look at the curly corriedale, this is fast becoming one of my favourite wools to work with:
Now I just need to figure out a way to hang it so it can be hung in front of a window and the frame / hanger does not cast a shadow that would detract from the design….
I also repeated the dyeing a variety of different fibres exercise. Following advice from Ruth I tried some grey and brown too (thanks Ruth). It’s still a bit monochromatic but an improvement on the last version 🙂
Linking up to nina-marieoff the wall Friday

Sun Dyeing

I was reading a blog a couple of weeks ago with some scepticism. With the benefit of hindsight I concede my scepticism was a little unfair. The blogger in question had posted about sun dyeing and said that you don’t need to buy those expensive photo-sensitive fabric dyes / paints, any old fabric paint will do. My initial reaction was, if any old fabric paint will do why is there a market for those expensive photo-sensitive paints? Too good to be true right?

The scientist in me made me set my scepticism to one side long enough to perform a little experiment. We all want to save our pennies to spend on more textile toys don’t we??

Materials:

  • Light coloured cotton based fabric (I expect silk will work too but synthetics possibly not – those are experiments for another day 🙂 )
  • A pad of newspaper or a large box (I used a plastic under-bed storage box)
  • Masking tape
  • A spray bottle filled with water
  • Fabric paints (I used Setasilk (iron-fix) silk paint and acrylic paint mixed 50:50 with textile medium). If you don’t plan to wash your fabric you can replace the textile medium with water.
  • Large brushes (I used the foam type)
  • Resists – I used leaves but anything that will lie flat on the fabric and block the light all work well. Paper cut outs and opaque stencils work well.

This is what I did:

  • Stretch your fabric over a box or a pad of newspaper with masking tape
  • Spray with water until evenly wet, allow the water to disperse while you gather some leaves or other objects to create a resist.
  • Working quickly, cover your fabric with fabric paint and lay out your resists, ensure they are as flat as possible to the surface of the fabric.
  • Leave in a sunny spot for 2 hours (beware of breezes blowing all your resists away if you put your box outside – I left mine in front of a south facing window).
  • The hardest part is resisting the urge to lift the leaves to see what is happening underneath 😉
  • Remove the leaves / resists and iron for several minutes to heat fix.

Sitting in the sun catching some rays, the pink and blue on the left is the Setasilk paint and on the right is red acrylic paint mixed with textile medium.

I think I applied the acrylic paint (on the right) too thickly, hence the effect is not so noticeable. In the areas where the paint is a little thinner the leaves are paler.

A second attempt with a lighter coating of acrylic paint. I also sprinkled a few grains of rock salt in the bottom right to see what effect that would have:

After 2 hours on a sunny windowsill:

Close up of the salt effect, it appears to have concentrated the paint under the grain and drawn the paint from the surrounding area:

A close up of an acer leaf outline.

Have you done any sun dyeing? What paints / fabrics did you use?
Linking up to nina-marieoff the wall Friday

Lots and Lots of Cards

This week I have been using some of my handmade papers from a few weeks back and combining them with a variety of felts and fabrics, including my first foray into using Lutrador, to make a batch of cards.

These pieces are Lutrador and 3D fabric medium:

These cards were made from pieces of rainbow dyed felt with hand and machine stitching:

Evolon fabric and Markal paintsticks:

And finally some acrylic felt and organza, with machine embroidery that has been melted with a soldering iron:

They are all 5 inches x 5 inches (13 cm x 13 cm in new money).

And this is just the beginning, I have at least 20 more waiting to be stitched and attached to card blanks, I hope there’s something good on telly… ;o)

Linking up to nina-marieoff the wall Friday

Commissions

For my last City and Guilds assignment I needed to work with a client to develop a scarf to their specifications, in true Teri tradition I didn’t stop at the one scarf needed to complete that assignment, I ended up creating 3 scarves for different people, all with very different results but interestingly very similar colour schemes. This has been a brilliant journey, and a lot of fun working with some good friends to develop their ideas and realise them into felt and fabric.

The first one was for a good friend, unfortunately she’s a bit photo-phobic so I don’t have any photos of her in her new scarf but I was so pleased with how her scarf turned out that I sought out some more “clients” to work with, and found 2 more willing guinea-pigs.

This is the first scarf, it is a reversible snood with a button to help mould the hood to the head when up. She wanted something warm that would offer some protection from wind and rain in purple / fuchsia pink.

This is the silk side:

This is the felt side showing some of the silk hanky decoration:

A better photo of the silk hanky decorations, these catch the light beautifully:

Having enjoyed the process of working with someone else so much, I went in search of my next victimclient, Juliet, a friend from work volunteered her services.

She wanted a  floaty, decorative scarf. After looking at some samples and finished scarves she selected nuno-felted silk. After lots of discussion (and I think some influence from Tam) we settled on an infinity scarf design.

This is Juliet wearing her new creation:

My third guinea-pig was Tam, another friend from work. She was quite clear from the outset that she wanted an infinity scarf, after looking at a selection of dyed fabrics she settled on the purple stripy cotton scrim (visible as the lowest fold in the photo) with wool in purples and reds with some orangey-red silk hankies for decoration.

I’m really pleased with how they all turned out, all very different and hopefully a reflection of their new owners’ personalities! Thank you all for helping me to complete this assignment, it has been a lot of fun.

Linking up to nina-marie, off the wall Friday