Category Archives: textile art

You can never have too much felt art

Since we moved to our new home in May we have been steadily adorning the walls with the pieces of art that moved with us, as we were deciding what to hang where, Mr TB pointed out that more than half of the art work on our walls is made from wool. I couldn’t disagree but still felt compelled to make a new piece to hang in the hallway, opposite the front door. Something colourful and cheery to greet any visitors. Much to my surprise, instead of complaining that we have too much wool on the walls, Mr TB helped me hang it.

I really wanted to play with a piece of silk purchased at Fibretron (a fibre festival in Hamilton, NZ), it has this wonderful wavy texture and can be peeled into fine sheets a little like silk hankies. I used some to decorate a large sheet of felt, layering and blending different colours as I went.

Once felted, I cut up the sheet into large petal shapes and continued felting them while shaping and blocking them, before laying them out to find an appealing arrangement.

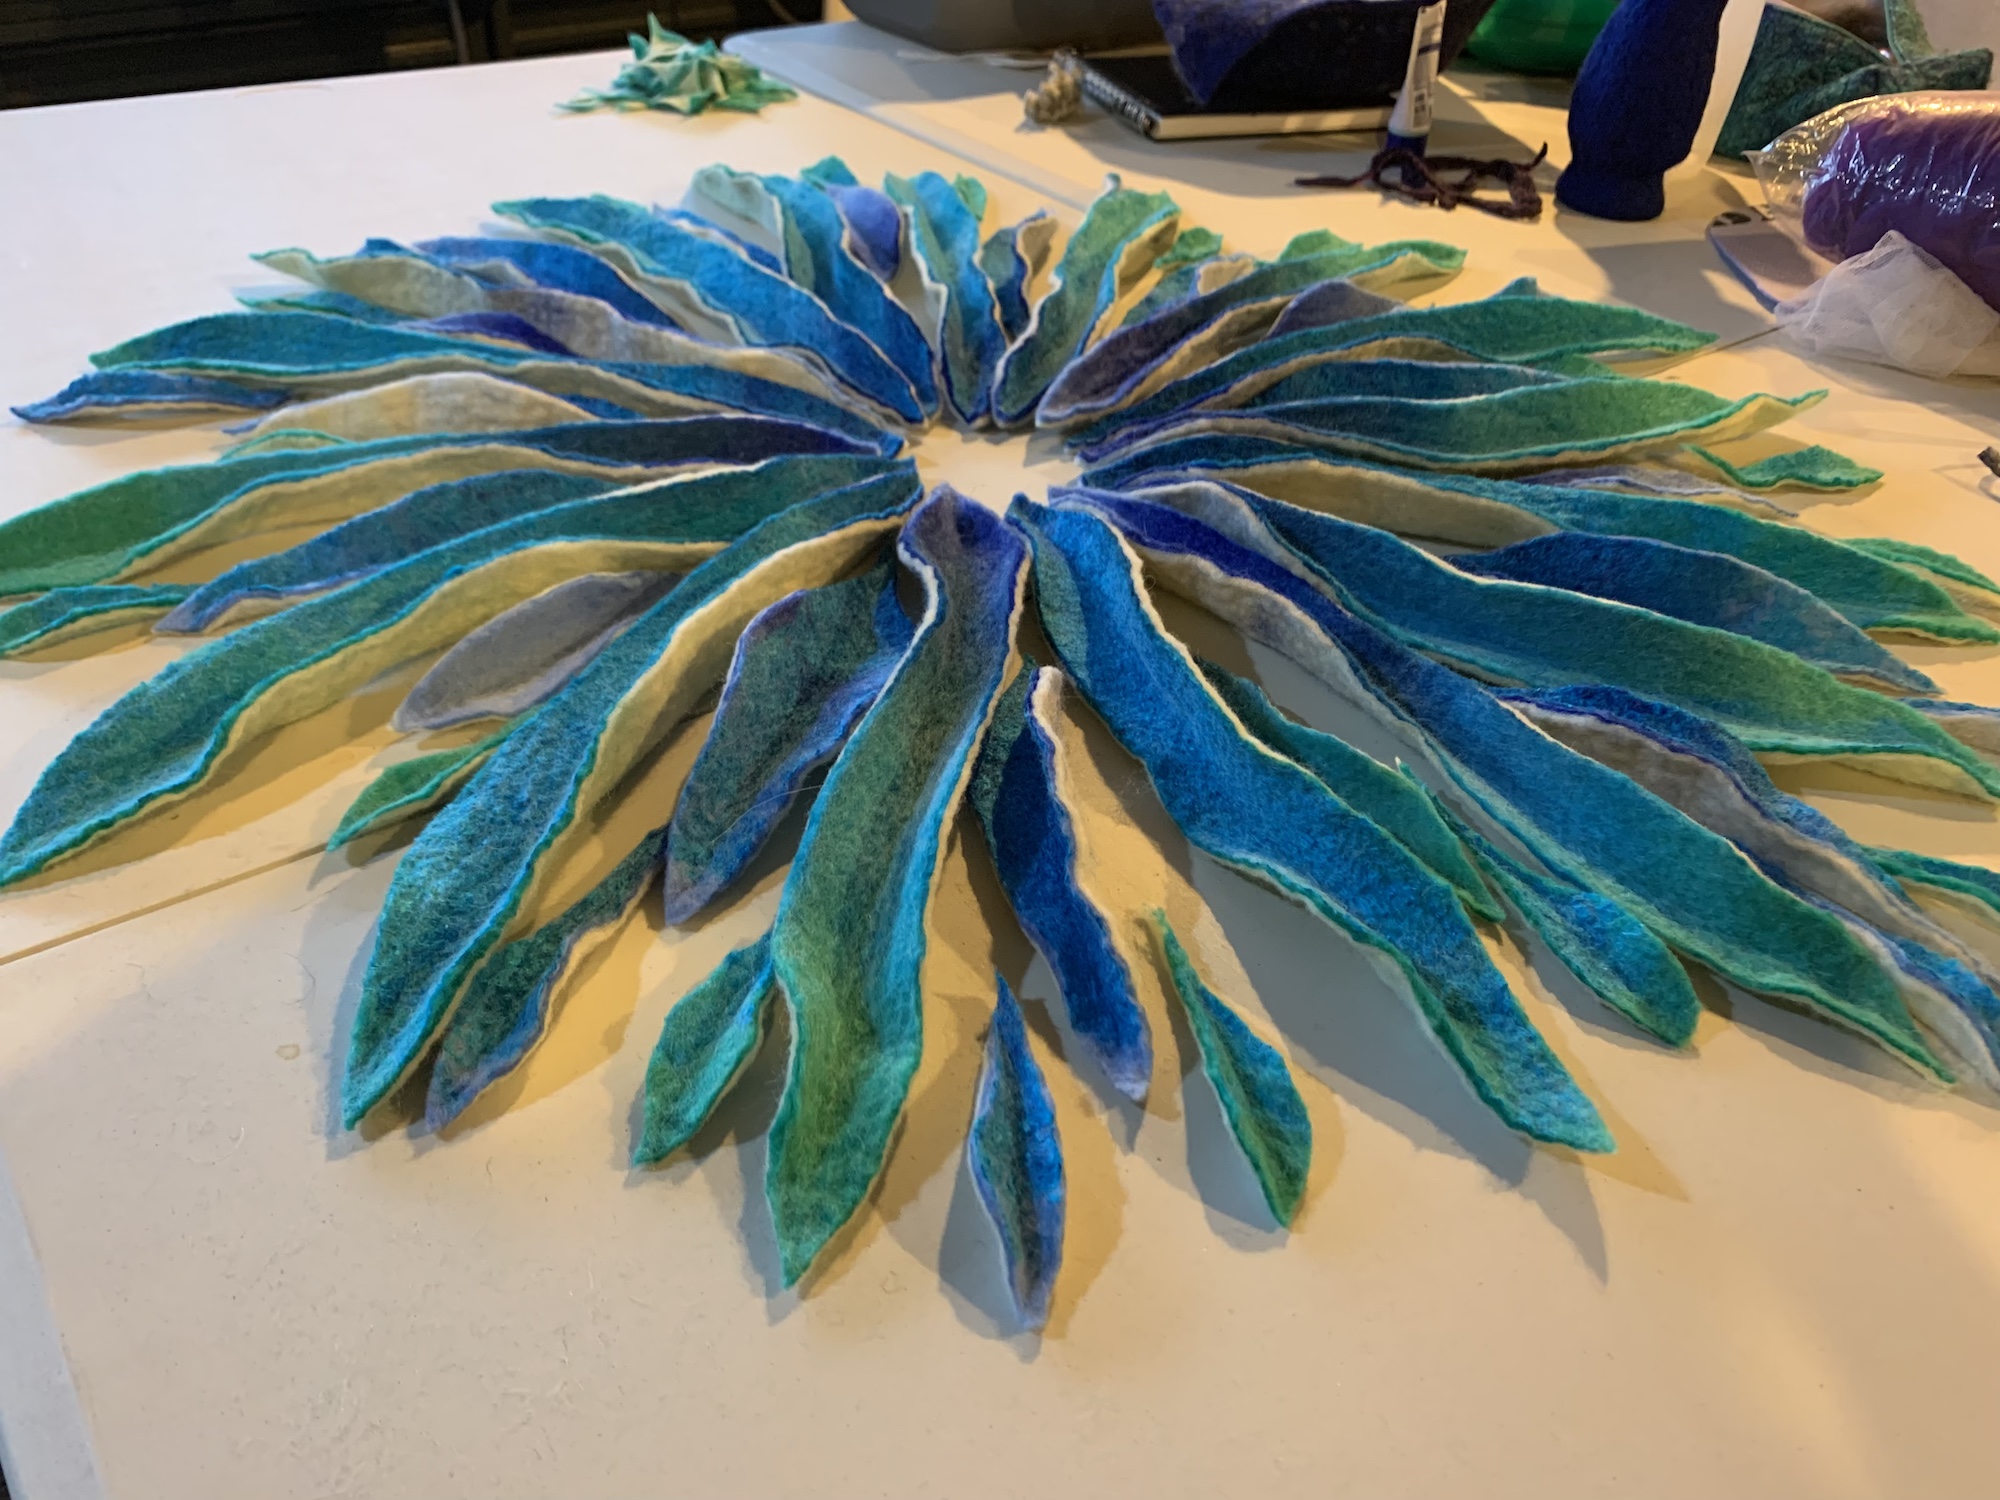
At this stage I felt like the centre really needed something, a complimentary colour perhaps? So I had a play with some different colours…

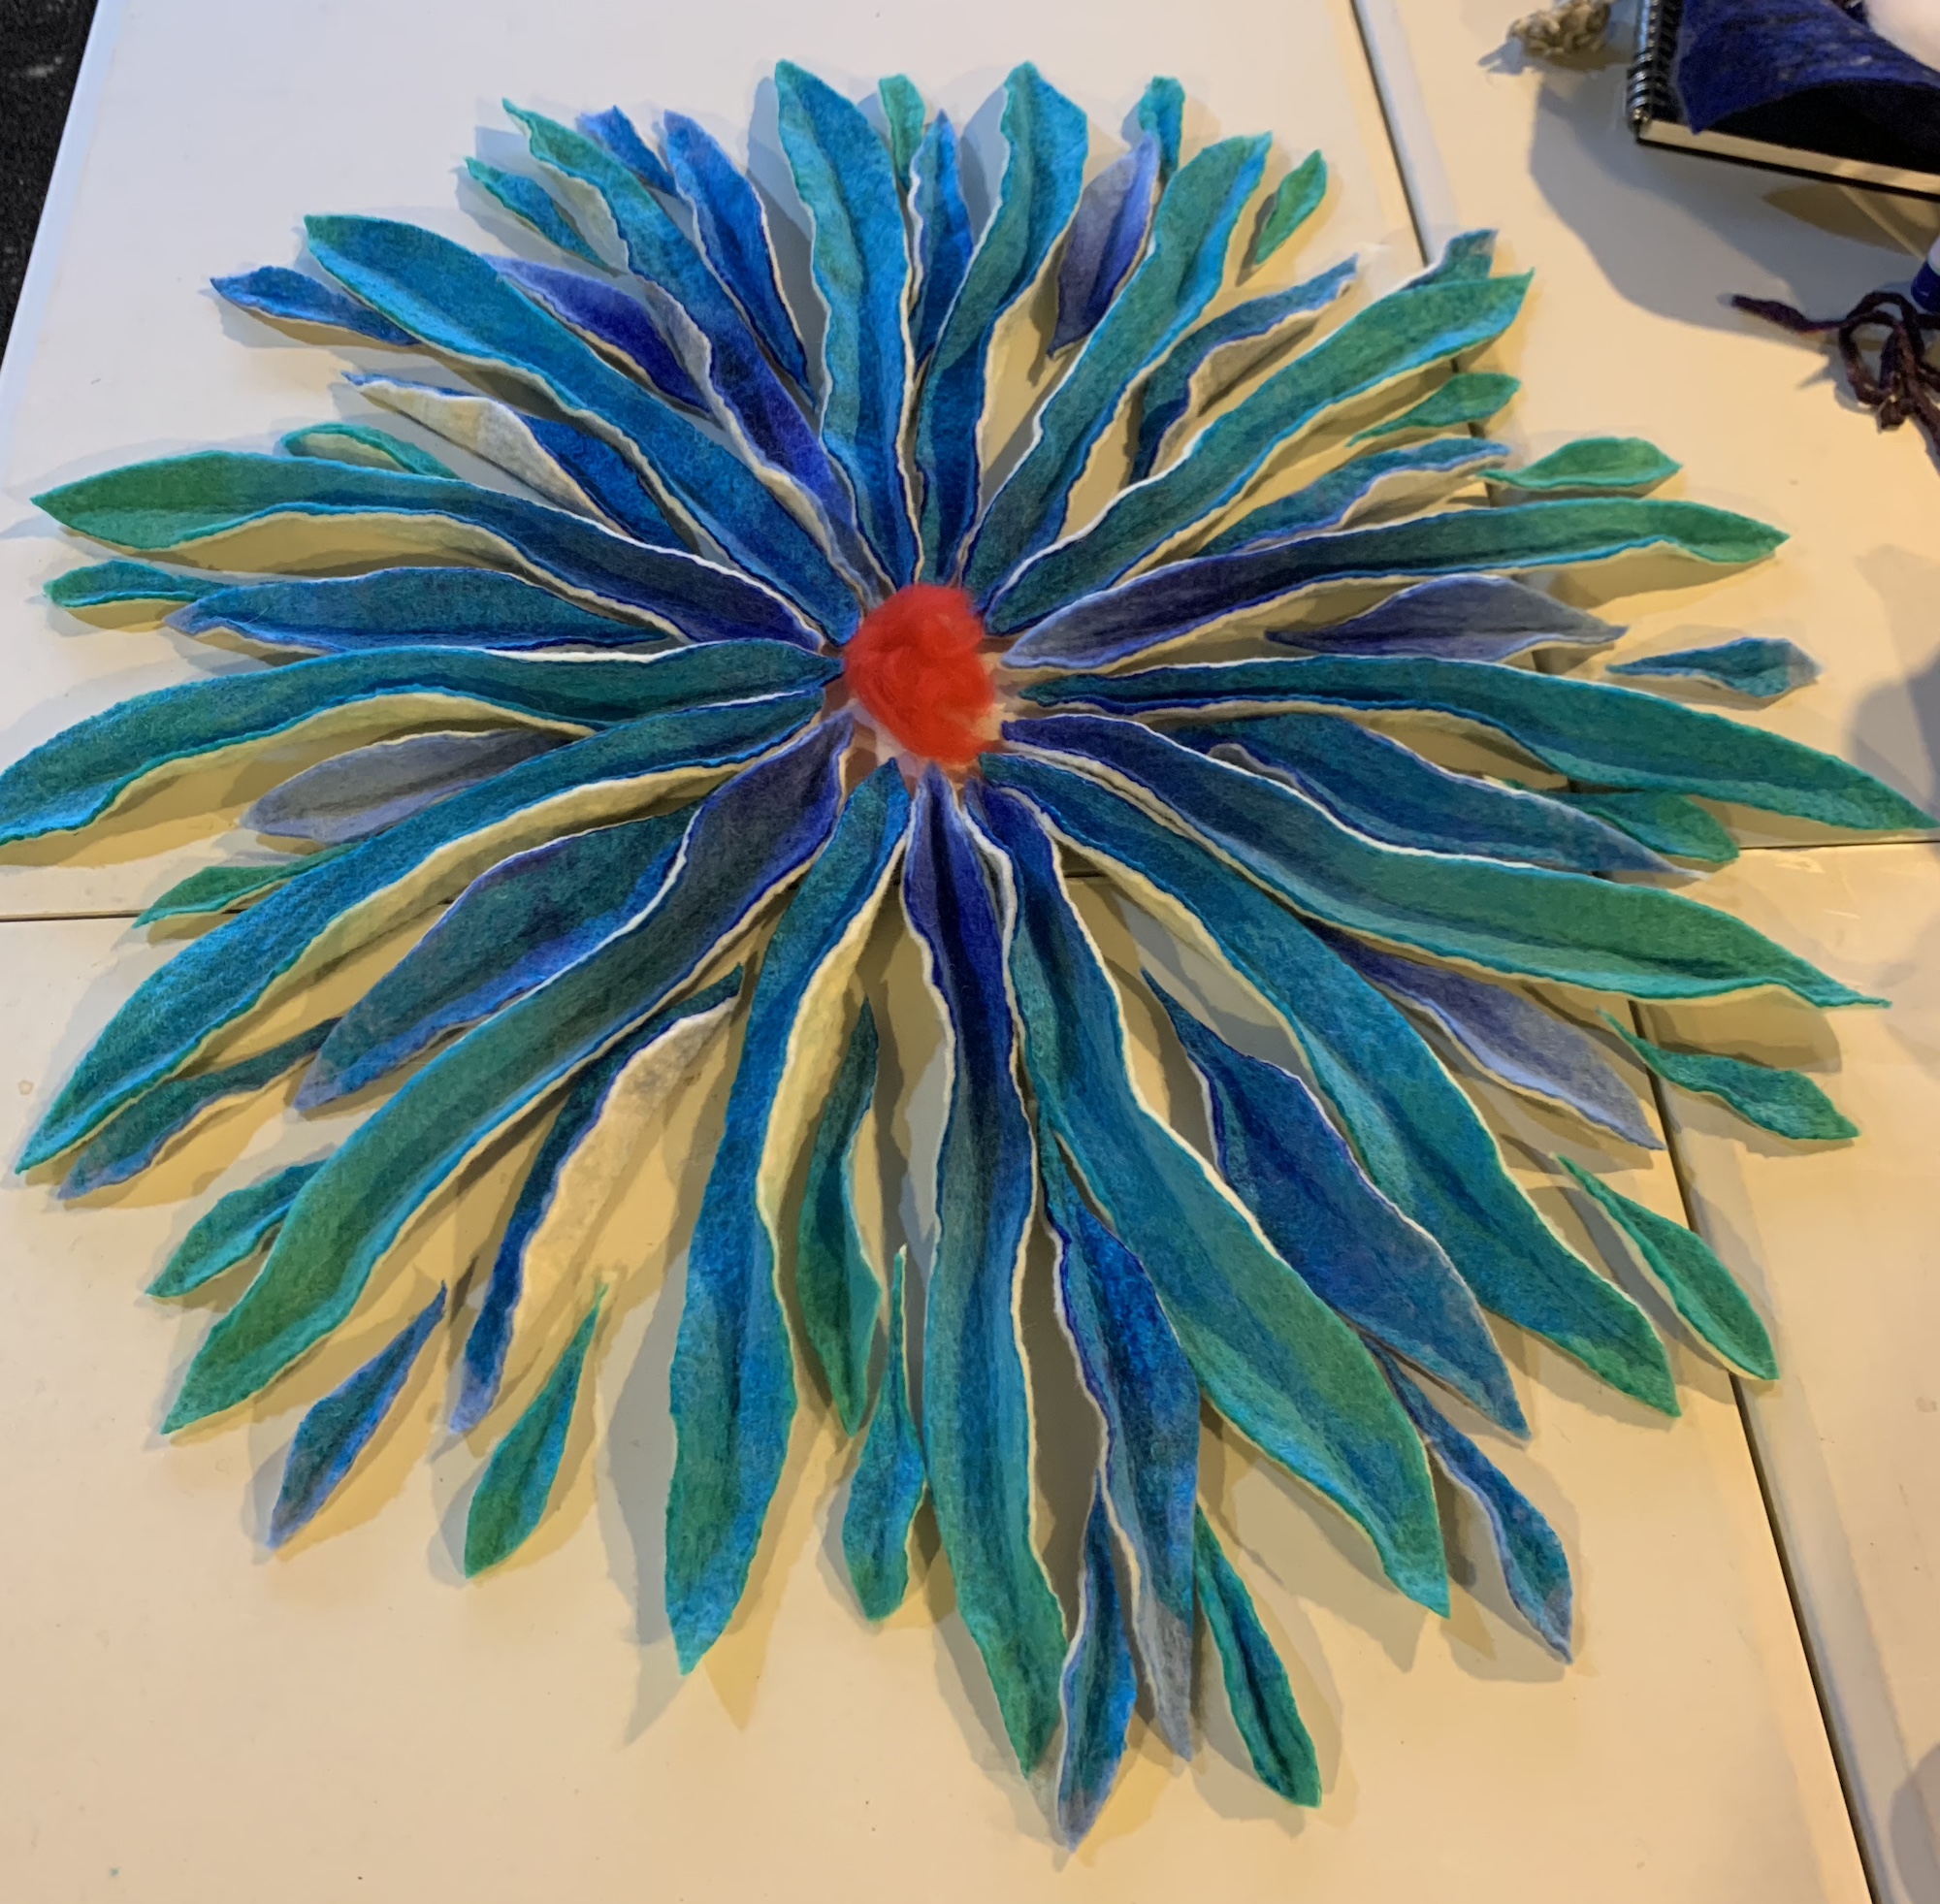
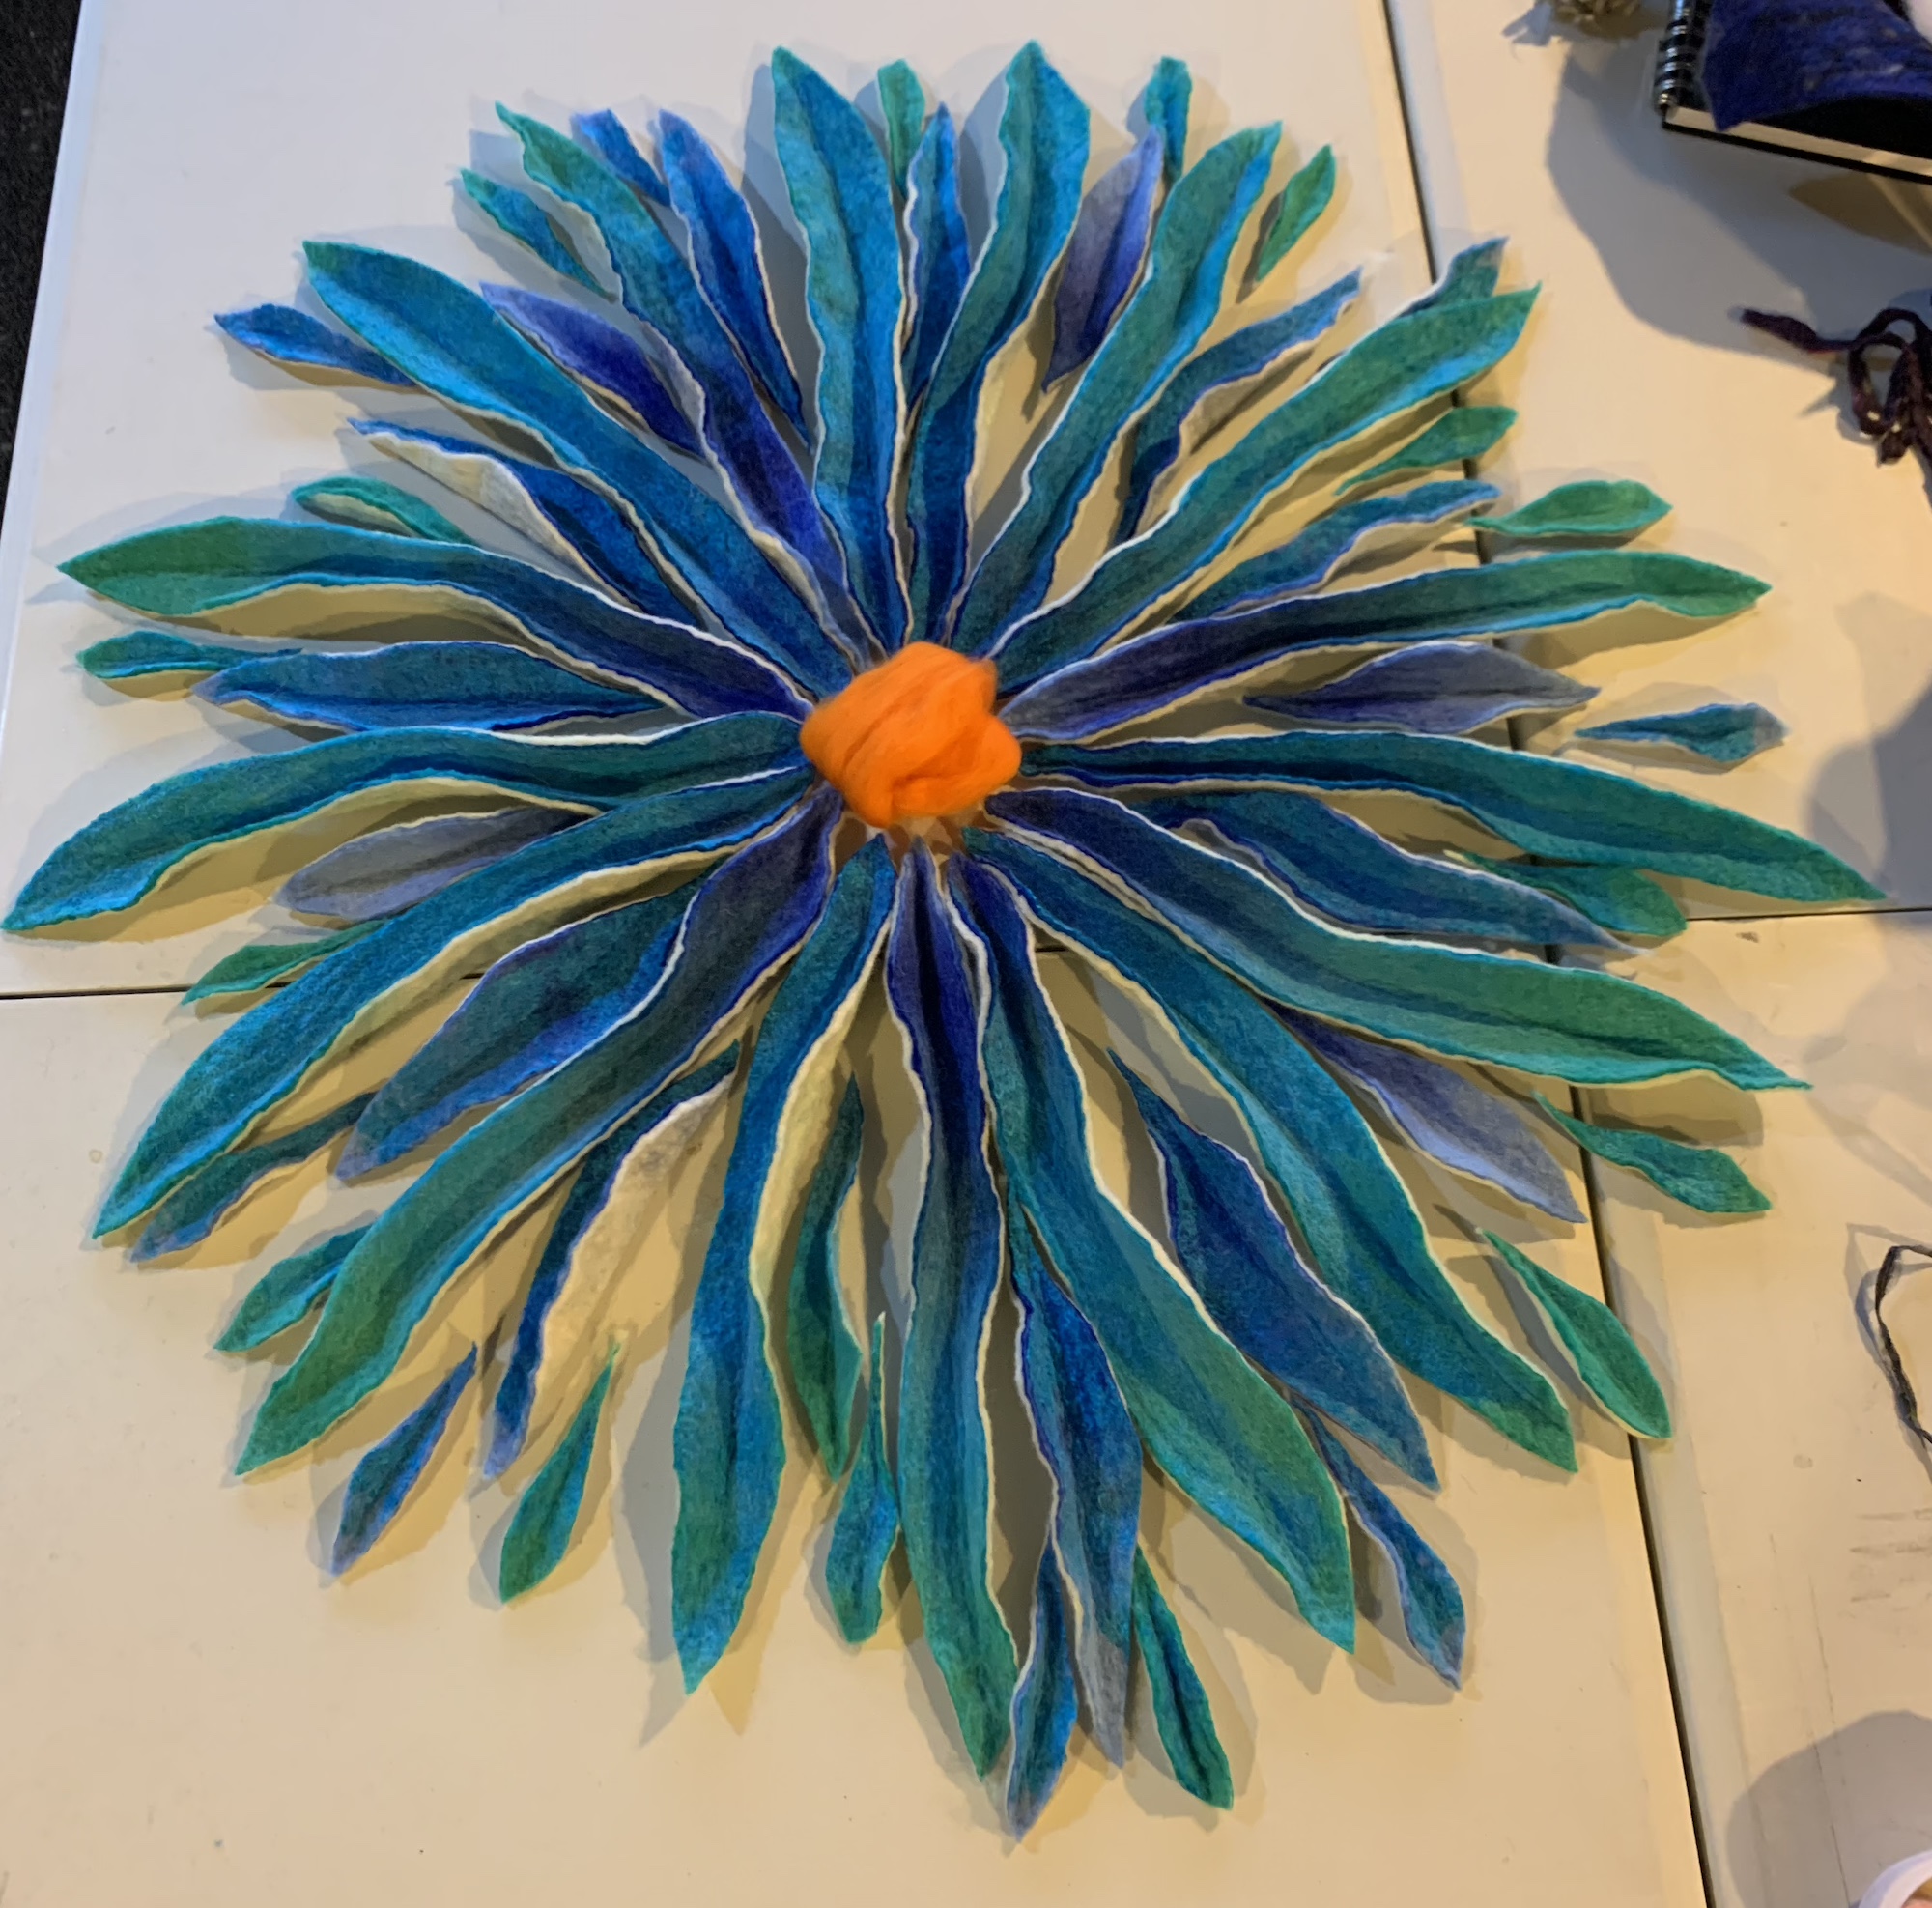
But they didn’t quite feel right.

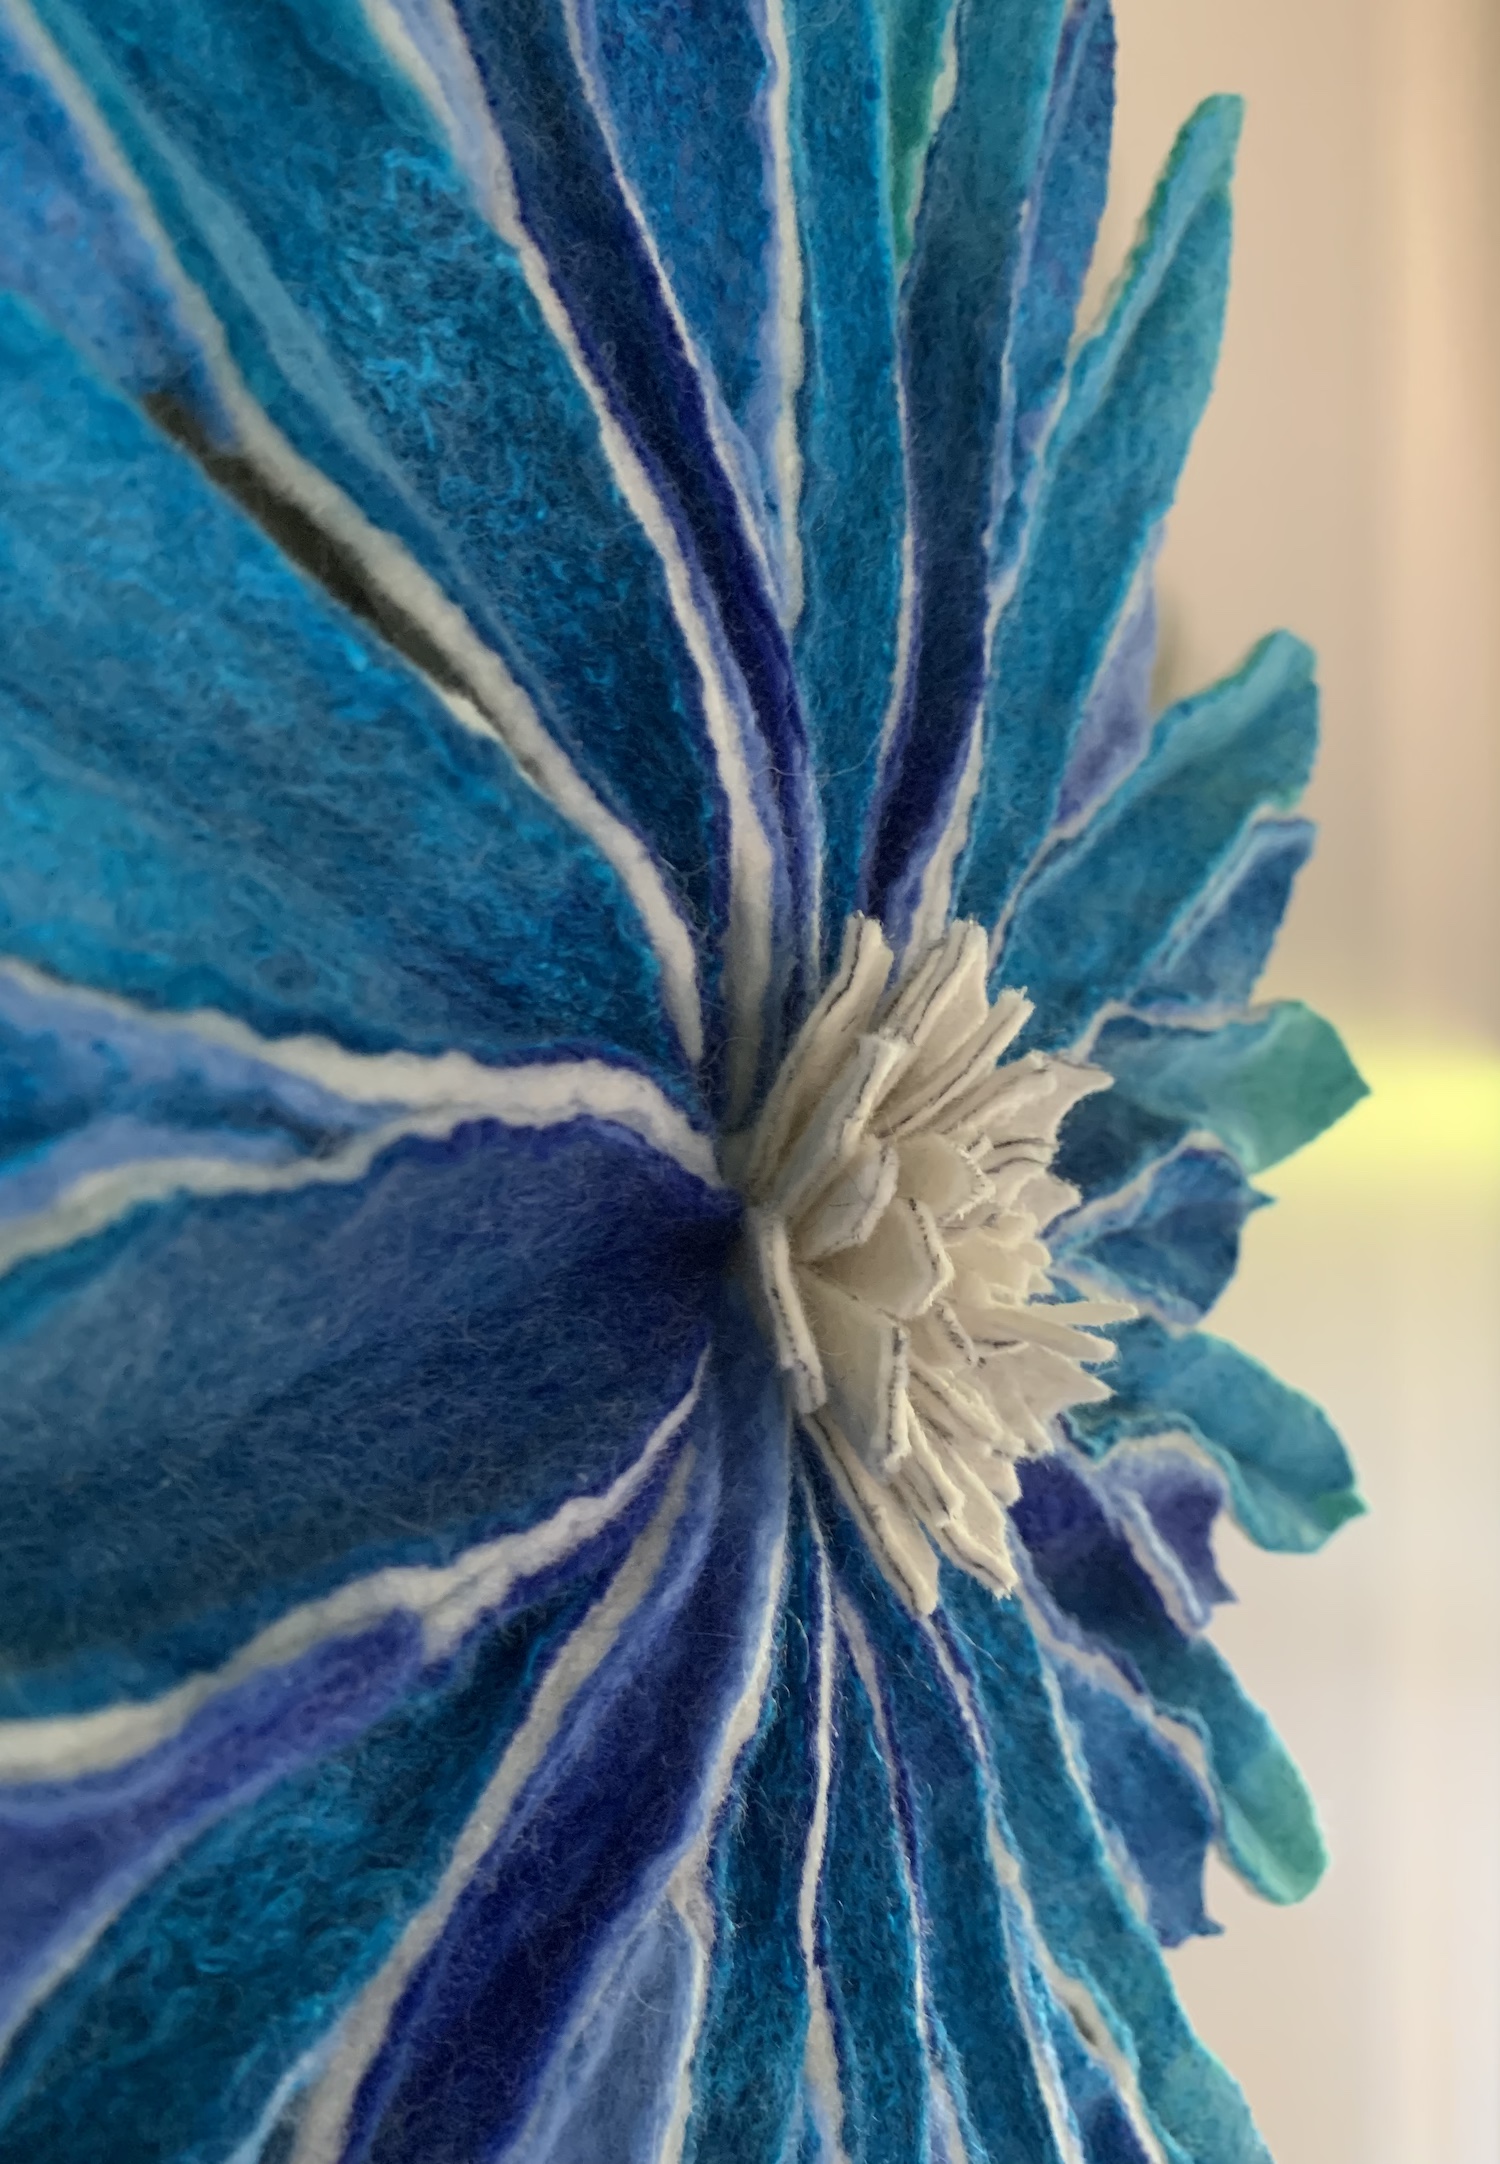
I have recently been playing with making different sculptural flower shapes and had one sitting on my bench. This looked much better, this is the piece after I had started gluing and sewing the petals together:

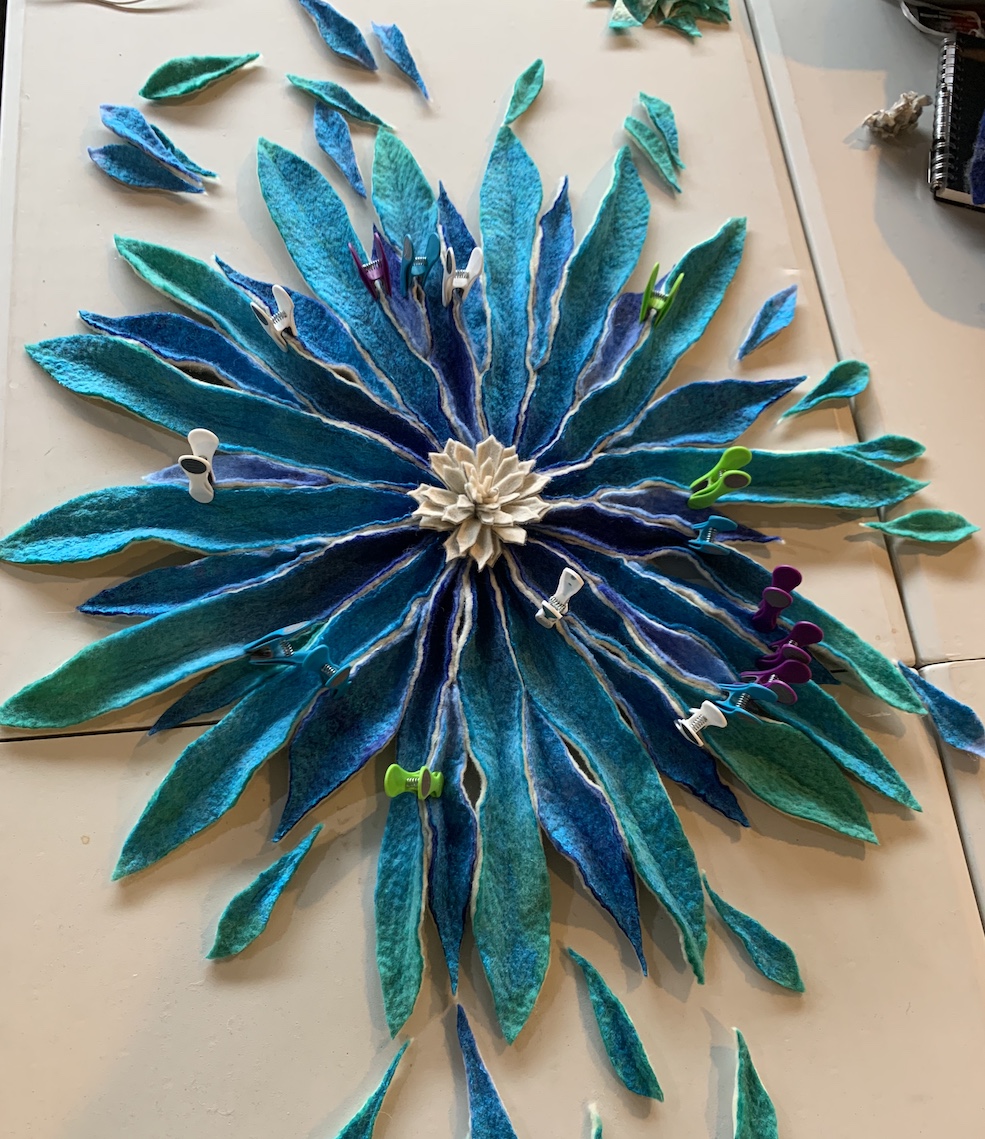
I tried making another central flower in the same blues as the large petals but it didn’t look half as good, it’s funny how some, unplanned, random elements just work together isn’t it? More on the blue flower at the end of this post…

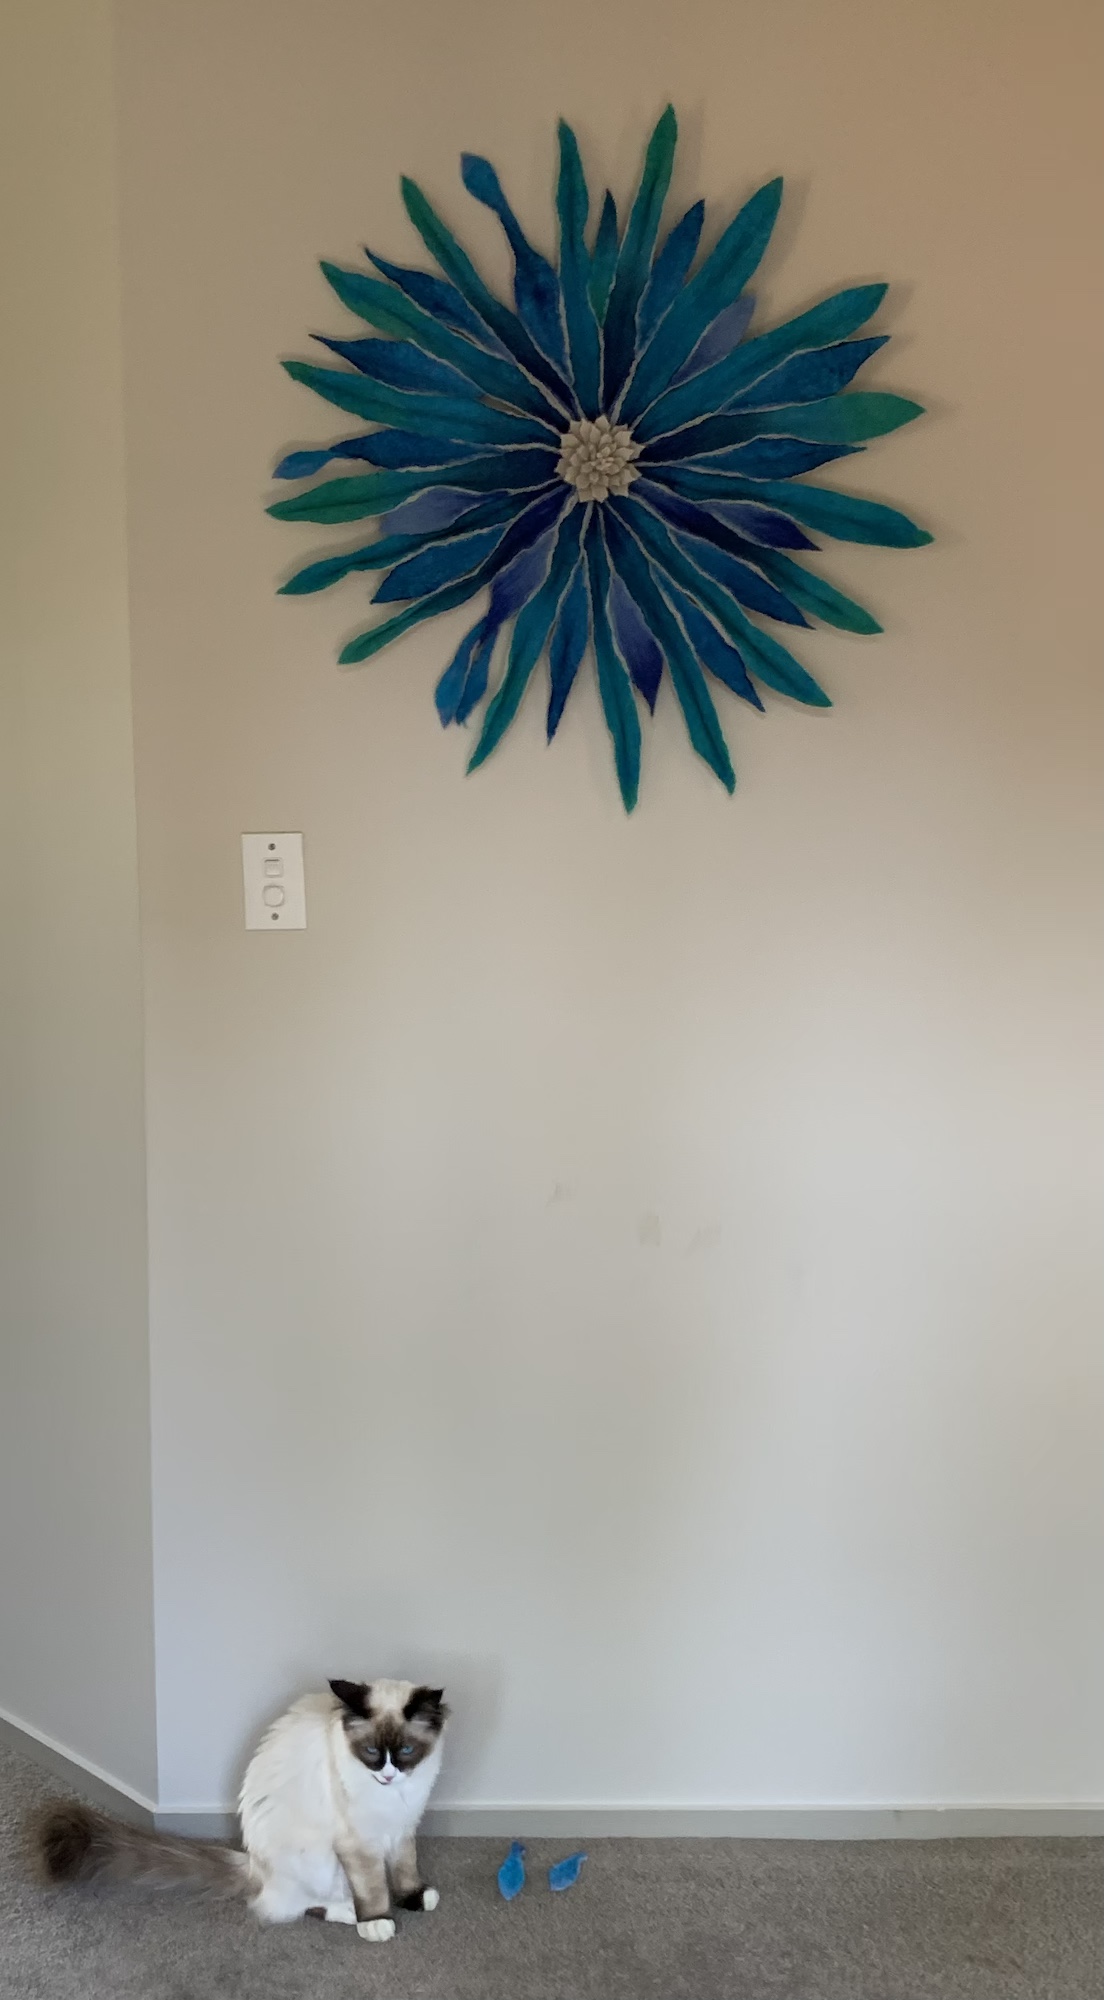
Here is the final piece assembled and hanging on the wall:

It had been hanging on the wall less than a week before one the fluffy terrorists discovered that, if he jumped really high (4 feet off the ground), he could rip the petals off and add to his collection of toys. So far the hanging has lost 2 petals….

Floki with his “prizes” – if you look closely you can also see muddy paw prints on the wall

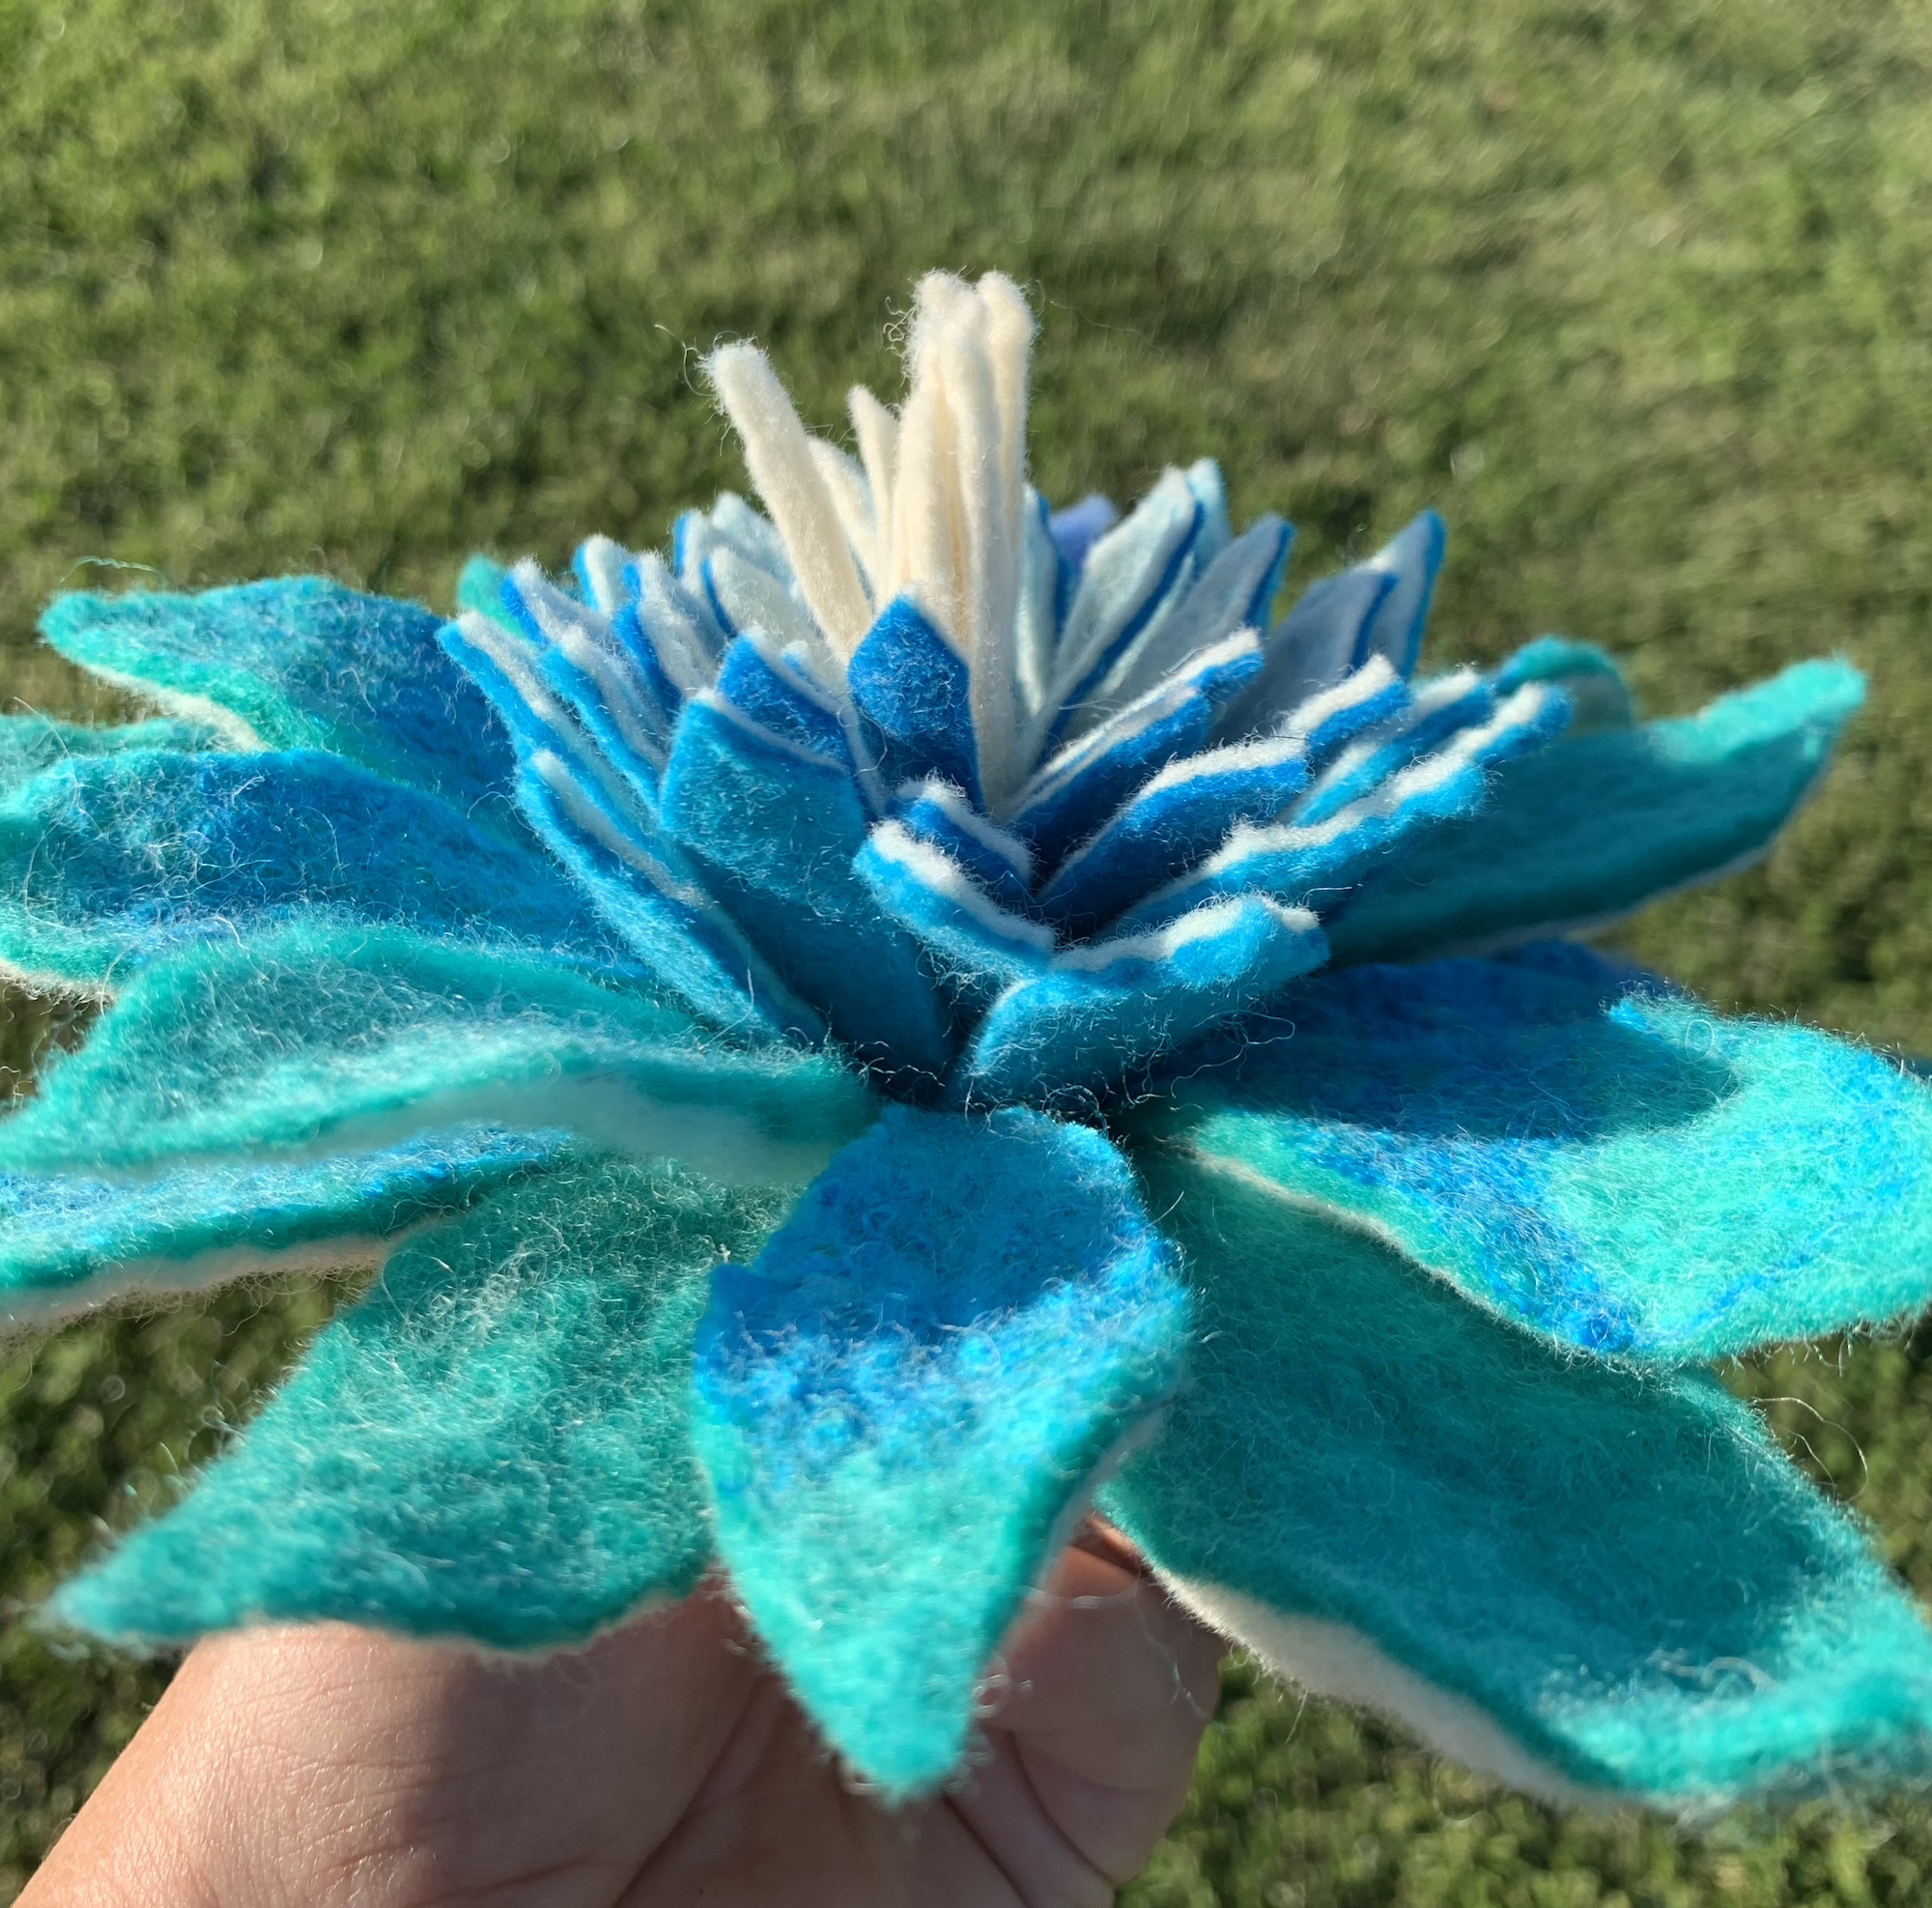
There were quite a few pieces of felt left over after making this hanging so I re-purposed them to enlarge the small blue flower:

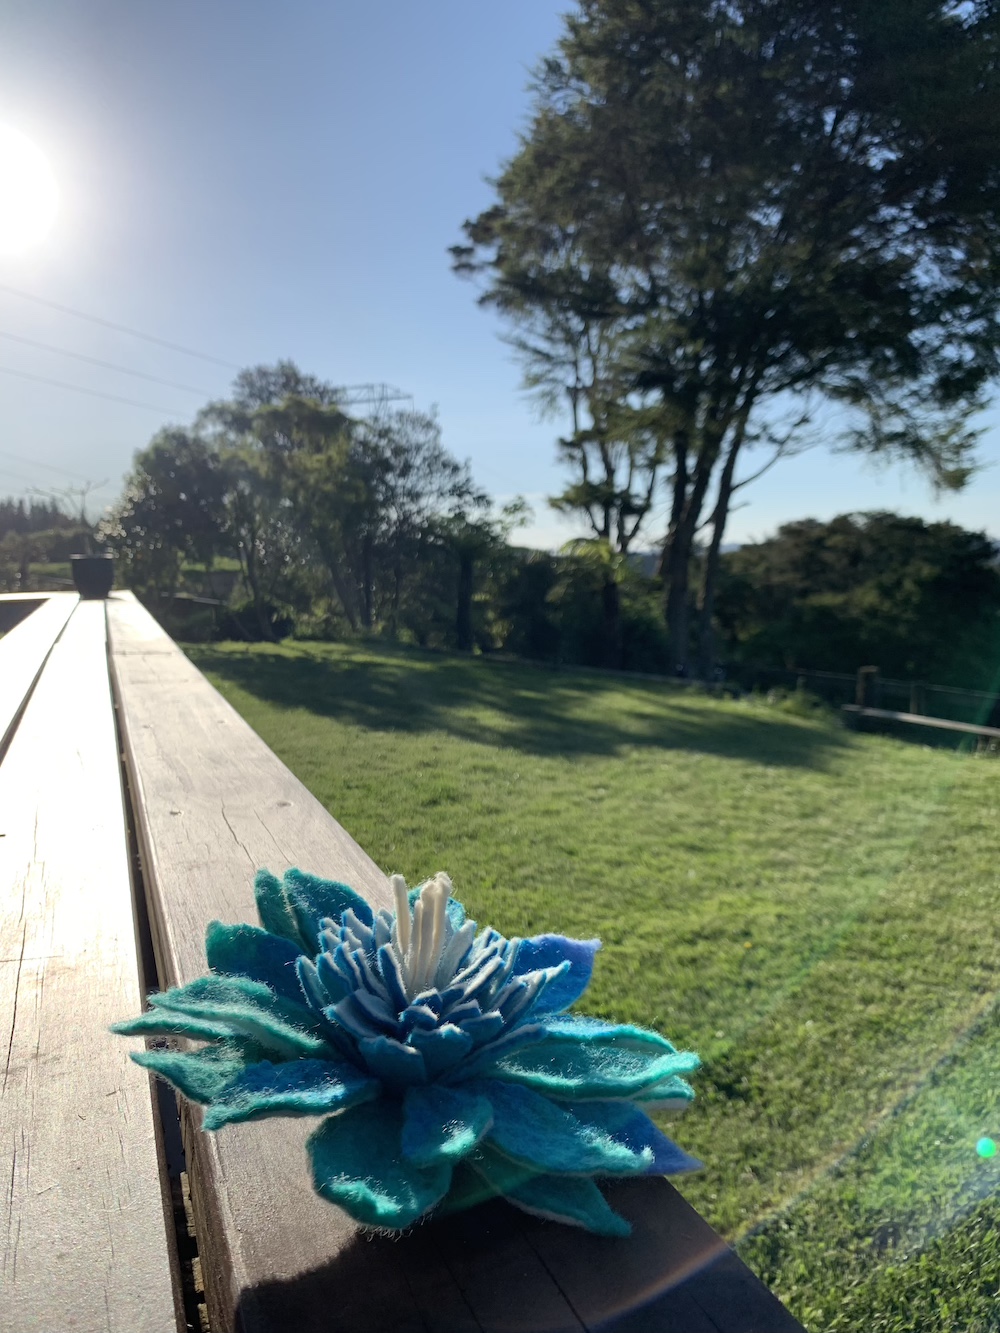
Now I feel inspired to make a whole bunch of these to create an artificial flower bouquet….

Summer has finally arrived here in Auckland, I hope the weather is being kind wherever you are.

Expressive Textile Printing with Dawn Dupree

Last week I was back at West Dean for another module of my Foundation Diploma, I had an absolute ball screen-printing on plant based fabrics (cottons, linen etc), guided by Dawn Dupree. We had a fantastic group and everyone was happy but exhausted by the end of our magical 3 days together. These are some of the pieces I made:

These first few prints were painted onto the screen and then print paste was squeegeed through to transfer the image to the cloth, it opens up lots of opportunity for different mark making and generally produced nice bright colours but is limited in that it is essentially a mono-print technique.

These next two prints were made using the same method but the muslin (cheesecloth) was under the cotton scrim during the printing so that the excess dye was caught by the muslin. This produced a feint print on the muslin that I added to by painting dyes directly onto the cloth.

Cotton scrim

I am planning to felt these 2 pieces to make nuno felt hangings.

Cotton muslin

This little chap from Costa Rica was printed from a line drawing that I transferred to the screen using photo emulsion. I wasn’t happy with the colour intensity of the initial print so again hand painted with the dyes directly onto the cloth, I am planning to add at least one more layer of colour to add some more depth as it still looks a bit flat.

This print also used the spider-monkey screen but also used some direct dyes and paper stencils for the leaf and discharge paste with splashes of yellow pigment for the off-white background.


This print was onto some commercially dyed (blue) cotton, the fish were screen printed with discharge paste mixed with some red pigment and the ripples were discharge paste painted on with a paint brush. The white highlights are silver foil.


These last 3 pieces used a combination of the techniques, mono-printing, direct dye (printed and painted directly onto the cloth), discharge paste and pigments suspended in binder. I evenΒ  managed to use the gecko and hibiscus stencils I made in Ruth Lane’s screen-printing on felt class. Click here for more information on that class.


Now the million dollar question… what to do with all these new pieces of fabric?

New Designers

Yesterday I was fortunate enough to spend the day visiting the New Designers exhibition in Islington, London. New DesignersΒ  show-cases the work of recent university graduates from a variety of creative disciplines. Week 1 focusses on textiles, fashion, jewellery, glass and ceramics and textiles were extremely well represented, especially printed textiles. I was a little disappointed to only find one fellow felt-maker, a lovely artist from Rotterdam who has recently moved to Dublin, Marleen Haaften. She makes beautifully sheer hangings by needle-punching different fibres into an almost translucent backing fabric.

Marleen Haaften

There were far too many individual artists for me to share them all here so these are a small selection of my favourites.

Andrew Sutherland’s textile monsters were derived from drawings he made as a child.


I was fascinated by Laura Ukstina’s modular approach to fashion, these pieces were inspired by Lego and she sees them as sections of a garment that can mixed and matched to create a variety of outfits depending on your mood.


Linda Anderson’s knitted pieces reminded my of sea anemone tentacles, I desperately wanted to run my fingers through them but thought better of it πŸ˜‰


Lucy Turner’s knitted pieces also reminded me of the underwater world, coral formations this time, although it turned out they were inspired by Tuberculosis!


While this piece by Heather Ratliffe reminded me of days spent looking at fluorescing cells down a microscope in my student days. There was a UV lamp on the left that made sequins sewn along the edge of the fur fluoresce. A fascinating interpretation of some fairly standard dress-making materials.

If you can make the time, this show is worth a visit, granted there are a few pieces that I thought looked like they had been crafted by teenagers, but given that most of the work was produced by young people I was enormously impressed by the very high standard of the work.


Open Studio

The last few weeks have been a bit of a blur, the end of May was spent preparing for my inaugral participation in this event and the the first two weeks of June were the open studio event itself. It has been hard work but a lot of fun, meeting new people and sharing the magic of felt-making with them.

I confess, I have been thinking of hosting an open studio for several years but had plenty of excuses not to, the main one being that I usually work in my kitchen and dining room, not very practical spaces for hanging / displaying work and not really fair on Mr TB to have strangers milling about while he is trying to relax after a busy week at work.

I did consider using the garage but it isn’t a very pretty space (breeze-block walls) and where would I put all the stuff currently stored in there? Although if I am honest I think most of it should go on Freecycle or to the municipal dump. This year I had a bit of a brainwave, we live in a bungalow and have a guest bedroom at the front of the house, what if I put the guest bed in the garage for a couple of weeks?

The space worked better than I had dared to imagine, the mirrored doors on the wardrobes made the room feel large and airy and there was just enough wall space for most of my ready-to-hang pieces.

It was just large enough to demonstrate felt-making but I was rather ambitious to think I could squeeze up to four students in there for workshops, as it turned out I managed to arrange it so I never had more than one student at a time. As always seems to be the way, in the excitement of completing each case I completely forgot to take photos of their work but since I was teaching 1 to 1, I ended up making a case of my own alongside them, these are what I produced…

I made a short video tour of my “studio”, please come in….

What did I learn from this event?

  • Allow yourself at least couple of weeks to prepare the studio, price your work, tidy the front garden / drive and redecorate / move furniture if necessary.
  • Have a visitor’s book to collect emails so you can stay in touch with your new contacts. The open studio event is an excellent way to meet new people with a shared interest. I was surprised by the number of people who returned with a friend a few days later to show them what they had found.
  • It took me a good hour to put out the signs, blow up balloons etc each morning, don’t under-estimate how long it will take. At least half of my visitors said they were just passing and saw the signs, they are really important!
  • Most people paid by cash (and even had the right change) but I would have lost a couple of sales if I didn’t have a card reader.
  • A friend told me she sells a lot of greeting cards at these events – that was a good tip, I had some professionally printed and it offered visitors the opportunity to support my work even if they did not have a lot of money to spare.

What will I do differently next time?

  • I will bake some of my world famous chocolate brownies as little treats for my guests (if that isn’t incentive to get on a plane to visit me, I don’t know what is! πŸ™‚ ).
  • Be patient, most of my sales came in the last 2 days of the event.
  • If I wasn’t running the event from my home, I would not open on a Wednesday, the footfall on Wednesdays was very low.
  • I will allow longer for the teaching sessions, it always takes longer than you expect doesn’t it?

I hope I have inspired you to take the plunge and participate in your local open studio event, I have met so many wonderful people, from other artists participating in the event, to new and potential clients and some potential teaching opportunities.

I had better get on with moving the bed back into the bedroom, Mr TB is already eyeing the room suspiciously, thinking I have commandeered yet another “wool room”, what he doesn’t realise is that I have felting / textile paraphernalia stashed in EVERY room, but we will keep that to ourselves πŸ˜‰

Christmas is a comin’

Today was a very good day, it was my first Christmas fayre of the year and it was at a company where I worked for more than 10 years, I sold a few prints but the best part was catching up with everyone, most of whom I haven’t seen since this time last year. The lady who organises this event said they are planning a much smaller scale event next year but I hope I can persuade her to repeat a similar event next year, or make it even bigger and better, I just need to network with a few more sellers who might be interested. If you are in the Surrey / Berkshire border area and would like a table next year please drop me a line via the contact form at the top of this page.

It is funny how the stuffed kitten was the only thing on the table not for sale but it was the one thing everyone made a bee-line for, I could have sold him a dozen times over! πŸ™‚


It was quite a luxury to have 2 x 6 ft tables today, I could really spread out…

This week I made a start on 2 new felting hangings during my life drawing group, they both need more work, some embroidery for the hands and a mixture of needle felting and embroidery for “Chantelle”. I am liking the random dyed backgrounds, I will be making more of those…

Chantelle

Happy Thanksgiving to all my US friends, I hope you are having a lovely day with your family and friends.


20 Felt Pictures and a Hat

Wendy Hales of DesignSpark contacted me a few weeks ago about teaching a group of children to make felt pictures at their half term holiday club. I confess I had only ever taught groups of up to 5 children before and the prospect of having 22 pairs of eager hands and all the questions that go with them was rather daunting! But the day was a great success, exhausting but very successful, largely due to the excellent help from Wendy and her assistant. These are some photos of the pictures the children made, they were working on the theme “autumn” and considering some of the children were only 7/8 years old and none of them had made felt before I am enormously impressed with how well they did. It just goes to show what a forgiving medium felt is πŸ™‚

img_1820

img_1812

img_1813

img_1814

img_1815

img_1816

img_1817

img_1818

img_1819


img_1821

img_1822

img_1823

img_1824

img_1825

img_1826

img_1827

img_1828

img_1829

img_1830


Alison another (slightly more mature πŸ™‚ ) student, this time from my first concertina hat class forwarded some photos of her latest hat too, the pointy tip makes me think of a quirky wizard’s hat and I love her use of silk, you can see it has a lovely sheen even in the photos.

front-of-brim-decorated-with-silk-alison

top-of-concertina-hat-alison

The second concertina hat class is well underway and we have another wonderful group of very friendly and supportive students, one of whom made her first (gorgeous) hat within 24 hours of me posting the tutorial, now that it is enthusiasm for you! πŸ™‚ I can’t wait to see the hats everyone else will make, I predict we are in for another bumper crop of incredibly beautiful and quirky hats… watch this space! πŸ˜‰

Fourth Quarter Challenge 2015

I’m still feeling a bit direction-less on this challenge, ambling from one idea to the next but I have at least managed to commit to making a couple of pieces of felt this week, both based on the challenge.

The first is a small hanging based on this photo of some cone flowers (rudbekia):

cone flowers

My idea for this picture was to use different tones and shades to visually bring some of the flowers forward while sending others into the background.

Using the ball of ochre coloured wool in the middle of this photo I blended some different tones and shades by adding different quantities of white or black.

IMG_5498

And used these batts to make some prefelts:

IMG_5499

I confess I cheated a little – the yellow in the middle is not a tone or shade of the ochre colour, the original colour is the square 2nd from right on the bottom row.

These prefelts were cut up and arranged on a square of black commercial prefelt:

IMG_5502

After lots of rubbing and a little bit of rolling all the pieces are firmly attached and it is ready for some finer details to be added.

IMG_5531

I quite like the jolly, cartoon-like effect but think I can make the flowers look more 3-dimensional with some shading using the left over prefelts and pieces of the batts.

This weekend I also made a start on a hooded jacket, again applying the challenge instruction of using just one colour plus black and white. There’s still some way to go but here is a little taster…

IMG_5504
Rummaging through my stash I found some bundles of carded natural merino batts in white and dark brown, I had an idea that using batts would speed up the layout, which it did, but any time I saved in the initial lay-out was lost needle-felting more wool over the thin spots at the prefelt stage. πŸ™

IMG_5505

I attached a hood to my favourite dress resist. Masking tape is great for making temporary changes to resists. You can see where I have permanently altered this resist to add sleeves using duct tape.

IMG_5503

Laying out the wool with some lovely Wensleydale locks for extra texture and some white mulberry silk for a little bit of sheen.

IMG_5508

Starting to layout the front sections:

IMG_5510
With a little luck I hope to post the finished jacket next time.

Some more dress-making, a sun hat and some fishes

Following on from Tatiana’s workshop, I have been making more nuno felt yardage for dress making. This is a top made using the same basic pattern from the orange shibori jacket.

I started this sun hat in January, using some hand dyed merino, the variegated roving yields a lovely mottled colour when felted, I also felted in a piece of hand dyed silk for decoration and texture

Today, I started working on a new wall hanging of fish on a reef. I am using some hand dyed pongee 5 silk and hope that the ripples and sheen will give the impression of water.

The weather was lovely, so after making the nuno felt I moved outside to “work” in the sunshine.

I have just ordered some longer stretcher bars and hope to share the final hanging next week.

Give Aways!!

To promote the launch of my new Facebook page I have decided to offer the chance to win a Β£20 (approx 30USD) voucher to spend in my Etsy shop as a thank you to everyone who has helped to spread the word. I will hold the prize draw when the number of likes reaches 100. It has already reached 13 with no promotion so I’m hopeful it will get to 100 within a couple of weeks and the lucky winner can use their voucher for a Christmas splurge.

To enter all you need to do is:

  1. like my FB page (click here)
  2. Share the “Give Away!!” post on your FB timeline
The winner will be drawn at random when it reaches 100 likes. GOOD LUCK!!
And another Give Away – TextileArt.org are offering 10 of their favourite textile art books for free, just follow this link to enter.
Onto more woolly matters… πŸ˜‰
This is the finished “sea creature” bowl I posted a picture of last time, I used the dyeing technique in this tutorial to created the colour graduations. The bowl was made using a combination of multi-layered resists, adding flaps of prefelt and stitching during the felting process. It was a bit of an experiment to put all 3 techniques together so I’m really happy that it has turned out so well.

I confess I made this scarf a couple of weeks ago but have only just found time to photograph it, it is some rainbow dyed habouti 5 silk with merino nuno accents. The silk catches the light beautifully but you will have to take my word for that – I just can’t seem to get sheen or metallic shine to show up in photos – can you?

The show at the Rural Life Museum was fun but not particularly lucrative, but all the other traders were lovely and there were some really interesting customers including one lady who my heart went out to; she struggled to find gifts for her overly discerning (and IMHO ungrateful) mother so had changed tack and was now buying gifts that she would like to receive in the hope that it would be regifted back to her. I think she has the patience of a saint, I don’t know that I would tolerate that sort of behaviour – I certainly wouldn’t continue to buy gifts for them!

Rainbow Theme Continues….

I have been making a few of these recently, dyeing the prefelt is a lot of fun and I think the finished effect is very striking and the bright colours make me feel happy. This piece reminds me of aliums as they go to seed so have called it “Rainbow Alium”.

I also managed to mount my coral piece onto a wooden frame ready to go onto Etsy. I decided the white shows off the folds beautifully so chose not to dye this one. Here is the finished piece.